
Looking to set up your first eCommerce store and don’t know where to start? Does adding products and handling a shopping cart look like a complete mishmash to you? Well, we’ve got some good news.
Adding products and setting up a shopping cart using WordPress does not have to be difficult at all. In fact, by reading this mini how-to guide, you’ll gain the knowledge you need to perform this task effortlessly. So, sit back and enjoy.
The reasons for adding an eCommerce shopping cart to your website are endless, and no wonder why. A shopping cart connects the processes of product selection and online payment. It helps to monitor your site’s transaction count, simplifies and optimizes the payment process, and enhances your site’s overall customer experience.
However, there is yet to exist a built-in feature in WordPress that does just that. Fortunately, there are several potential premium WordPress plugins that you can easily install and let them do the work for you.
Today, we’ll talk about one of those plugins that can make an absolute difference to how you’re handling WordPress: WooCommerce. But first, let’s uncover the reason why you need to add a shopping cart to your WordPress website in the first place. ?
Of course, you can still write about the products and goods you’re selling on a simple WordPress blog. However, writing about products and selling them are two completely different things.
So what exactly are you supposed to do? In a sentence, you need to install WooCommerce.
WooCommerce is the best way to turn your WordPress website into a perfectly functioning e-commerce store.
Here’s why:
- It’s free and open-source, just like WordPress itself.
- Its set-up is easy and simple.
- It’s the most widely used plugin for any eCommerce website out there.
What can you sell with WooCommerce?
- Both physical and digital products such as e-books, presets, etc.
- Travel bookings and appointments of any kind.
- Subscriptions.
- Other products and services.
We can even say that WooCommerce allows you to sell basically anything with a price tag on it. Besides, anyone can use it with ease. If you already have a WordPress blog that you manage quite well, you won’t have to worry about dealing with WooCommerce.
Valuable hint: Once your WooCommerce store is fully operational, you can give kudos to the data-driven WooCommerce reports and analytics plugins that will allow you to understand your customers, get comprehensive products, and category reports, and find out more about checkout behavior patterns.
How to Make a Product List with WooCommerce

Step 1: Install WooCommerce
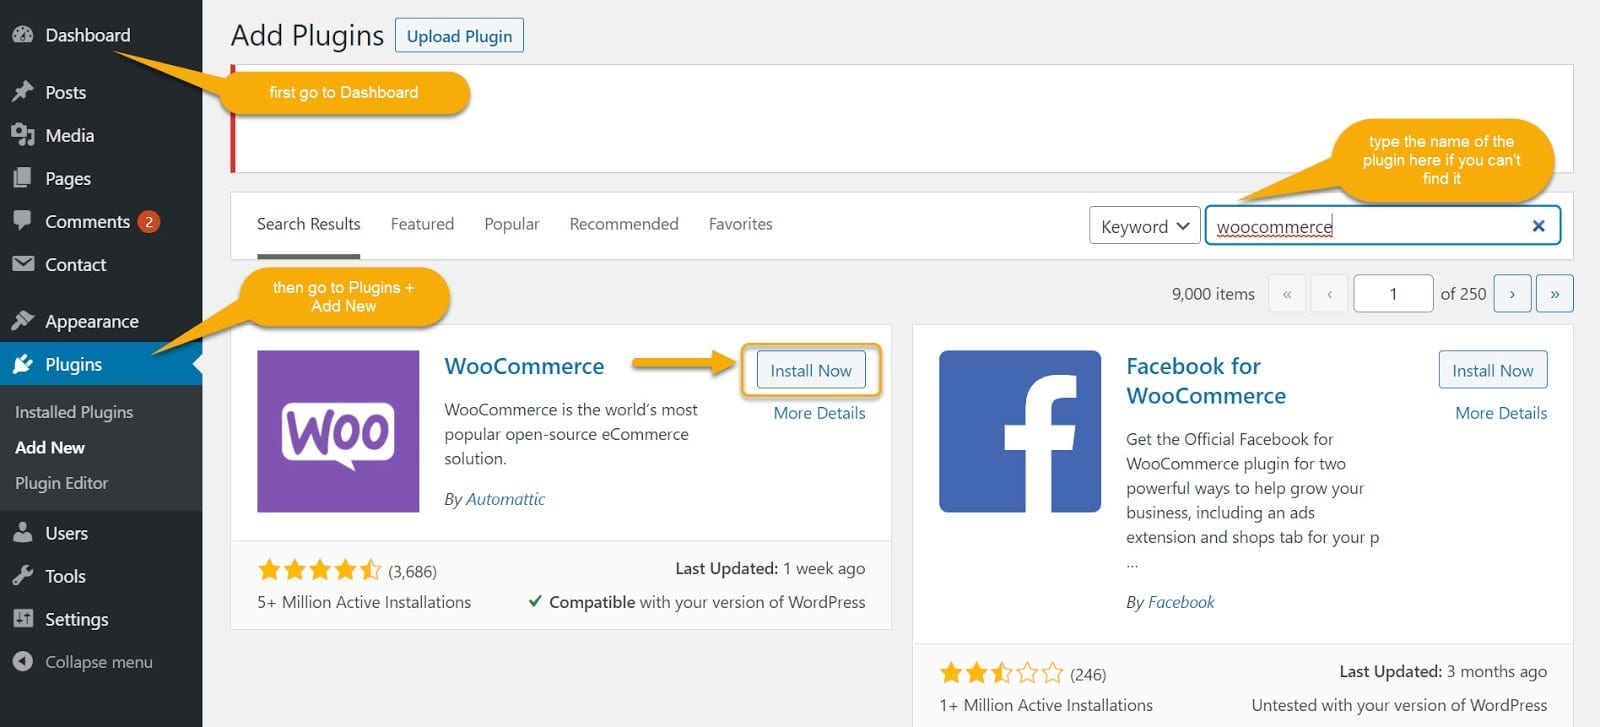
First things first, you need to install the WooCommerce plugin for fun to begin. How exactly can you do that? Start by navigating to your WordPress dashboard -> plugins -> add a new plugin and then install WooCommerce. Et voilà, you’re all ready to roll.
Here’s a little sneak-peak of what you should do:
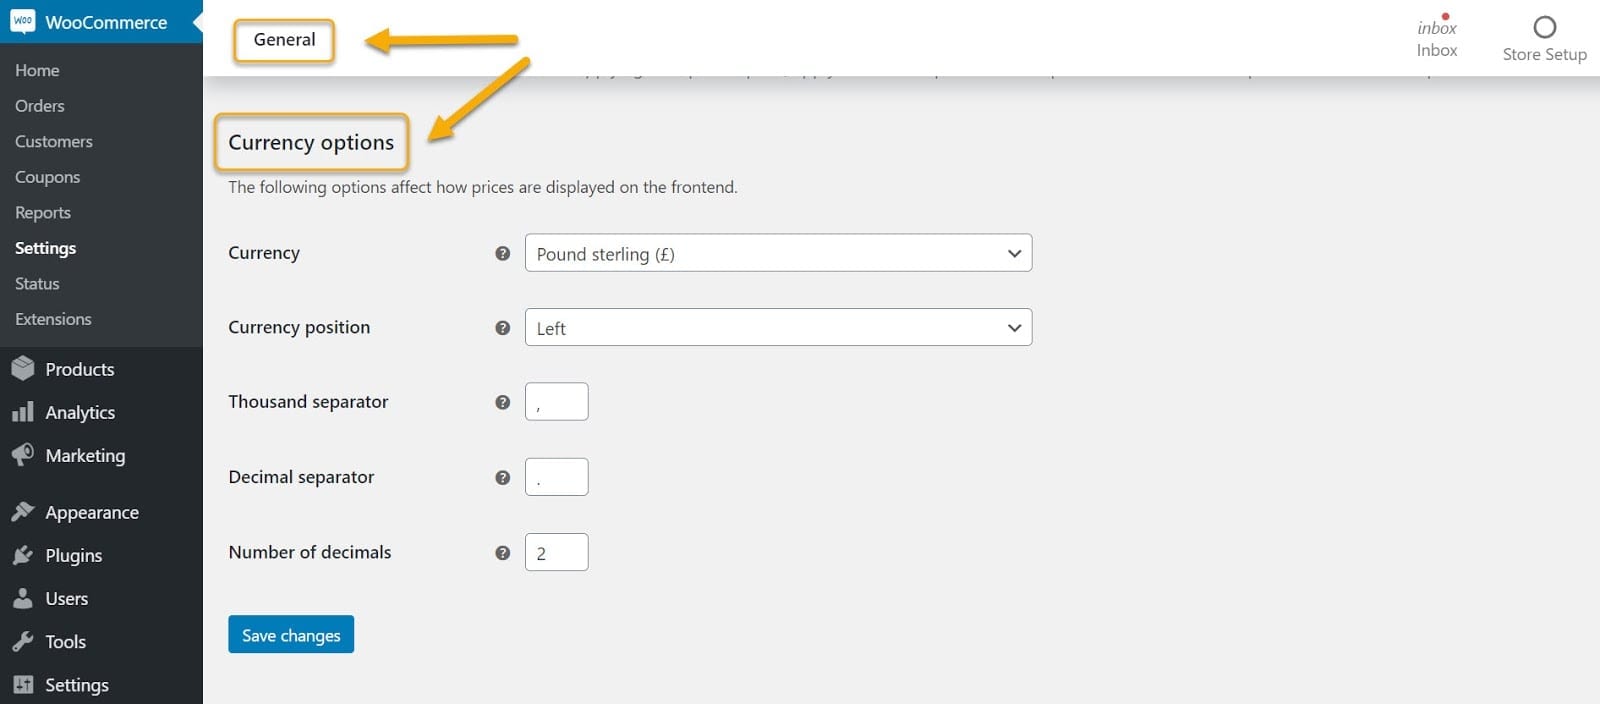
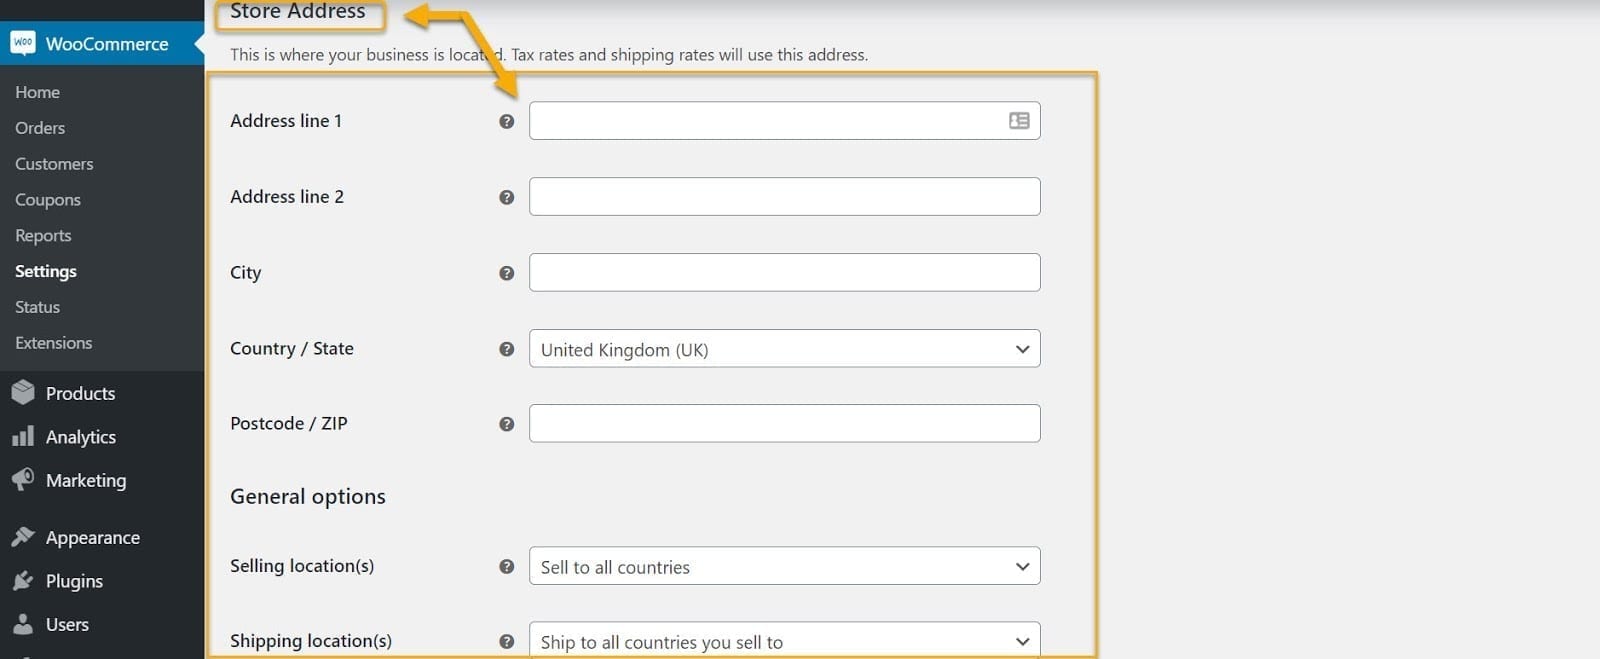
Step 2: Set Up WooCommerce
Next, you might want to fill out the essential information, such as currency options, address line, and general settings—all of which you’ll see below.
By using the WooCommerce plugin for your website, you’ll be able to create a much more user-friendly, customized shopping experience for your guests and customers. What’s more, you’ll be able to have in-depth insight and detailed reports of the site’s activity, such as orders, shipping, stock availability, and much more. Sounds great, right? There’s more to it.
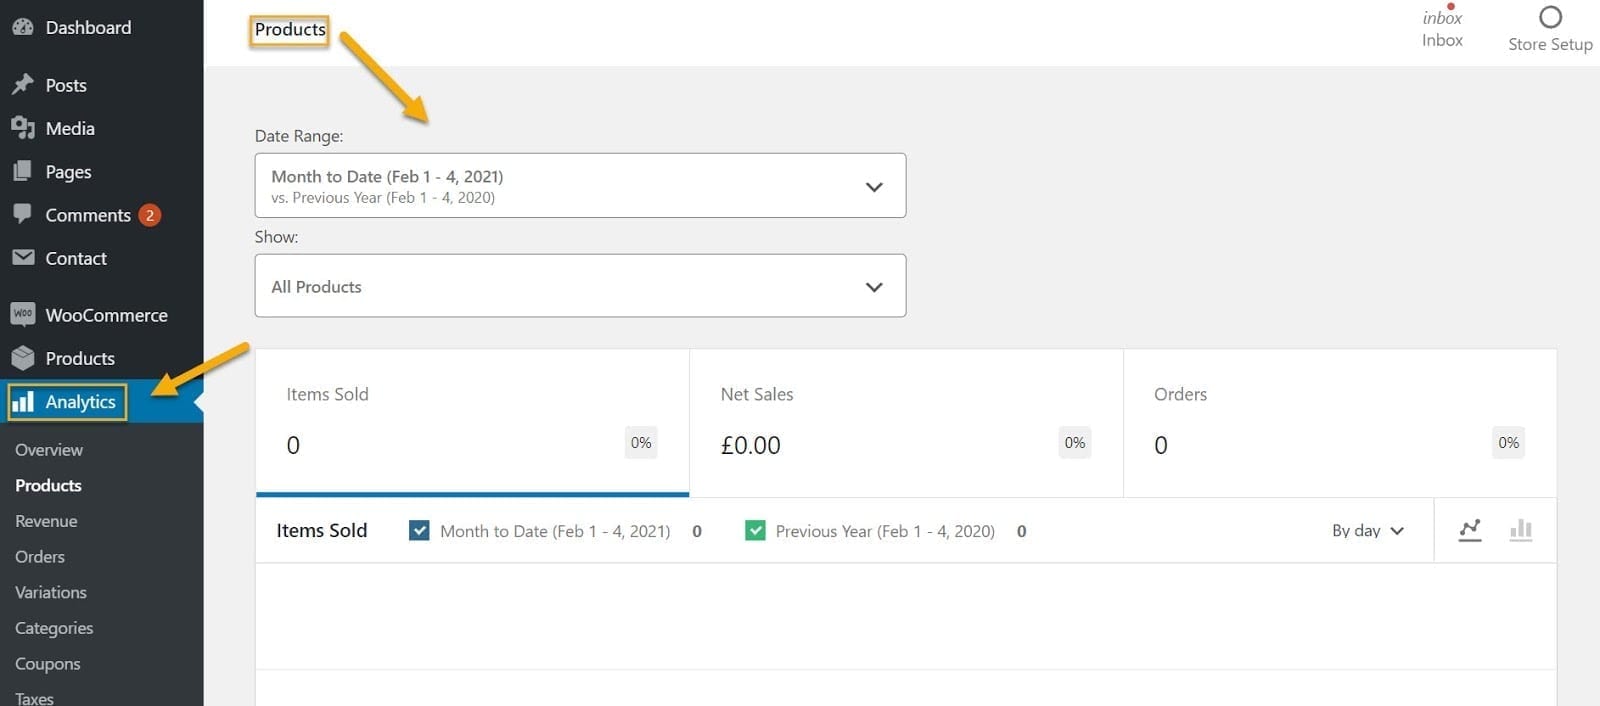
Step 3: Use Analaytics to Track Your Orders
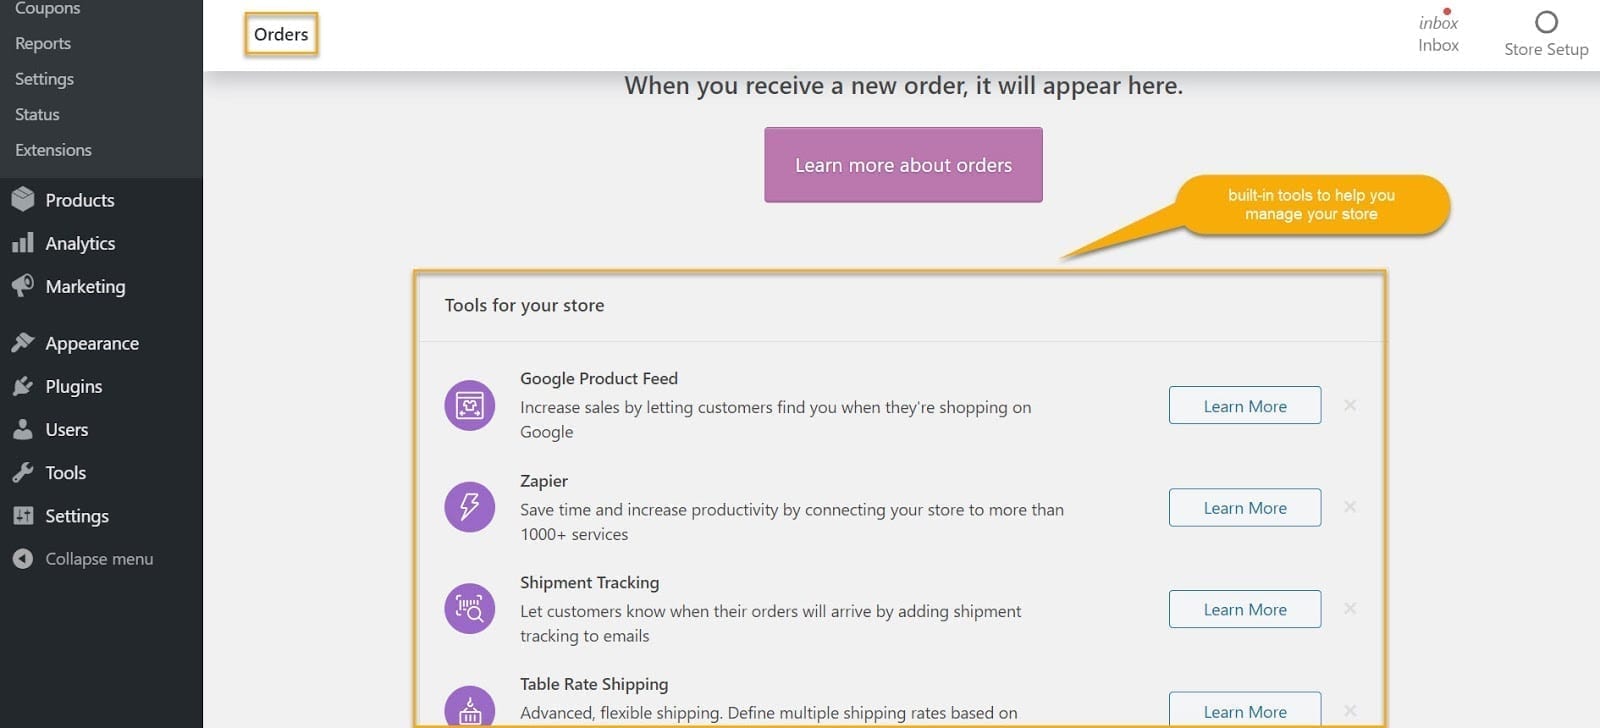
Next in line, we have Analytics and the amazing set of built-in tools that WooCommerce has. For example, with Analytics, you’ll be able to see how many orders you currently have, how much you have sold, and the total number of net sales.
Online stores are a different kind of website, and to properly work, they need special additions such as:
- a cart
- a product display page
- Checkout flow
- an account page, for registered consumers who often come back to your website
Luckily for you, once you install WooCommerce, the rest will follow as well.
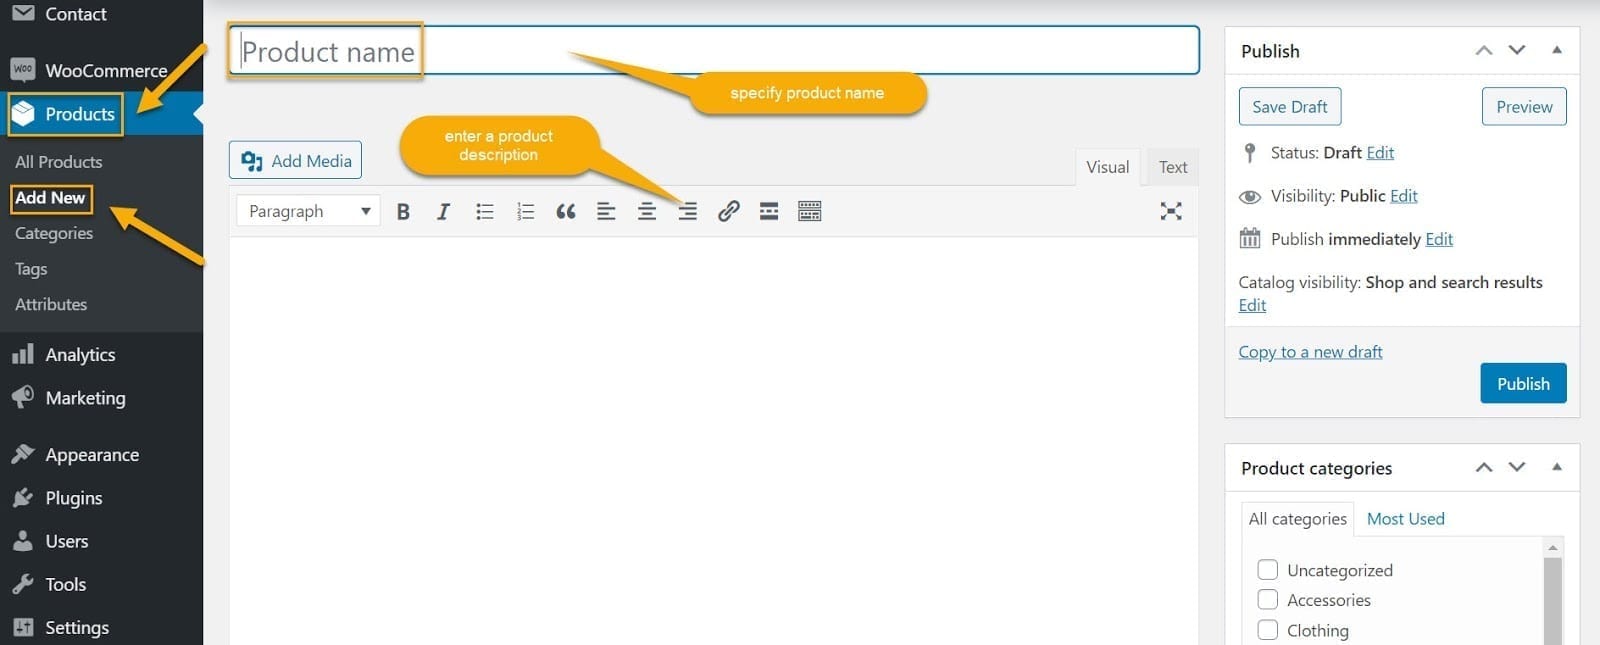
Step 4: Add Your Products to WooCommerce
This is the fun and exciting part of setting up a product list and adding a shopping cart. You need some items in the database for your store to be fully operational. For this to happen, go to your Dashboard, then Products -> Add Product, and begin enlisting your products.
After adding several products to your list, your product page should look like this:
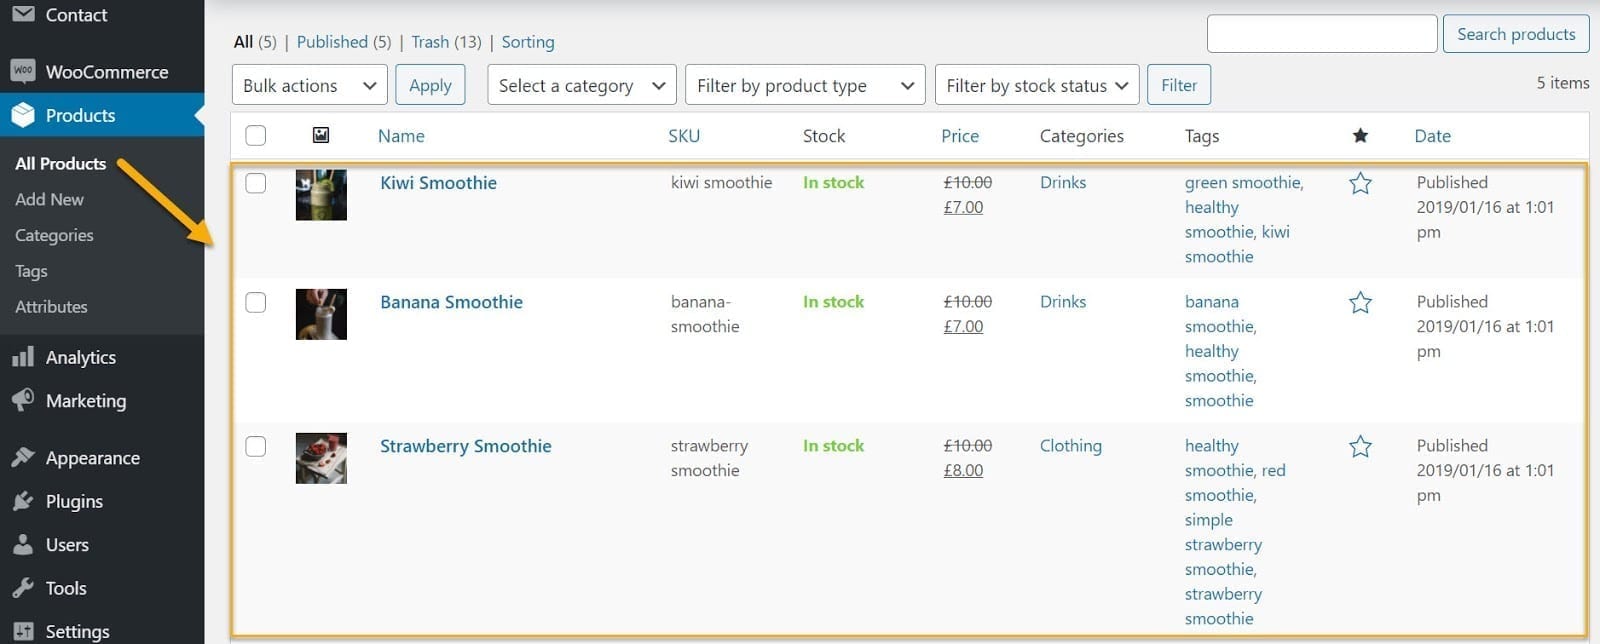
In this section, you’ll also see that you can make adjustments to your product categories, tags, and attributes. This means that you’ll be able to organize your products according to your customer’s needs and preferences to facilitate their website navigation.
Product categories are the most common way to group products with similar characteristics. The Products → Categories screen is where you manage your categories. Product categories, like post categories in WordPress, can be added, deleted, and edited. Here you have the option to add a ‘name,’ a ‘slug,’ a ‘parent’ in the case of subcategories, a ‘description’ as well as uploading any relevant images. For example, if you sell smoothies, you can have “Fruit smoothies” and “Vegetable smoothies” as your categories. But, if you sell electronics, you can have the following product categories: laptops, soundbars, smartphones, etc.
Categories can also be altered by dragging and dropping – this order is used on the front end by default whenever the categories are listed. This usually involves widgets as well as product page category/subcategory views.
On the other hand, product tags are another way to connect and intertwine certain products. Tags, unlike categories, do not have a hierarchy, so there are no “subtags.”
Going back to the smoothie example, inside “Fruit smoothies,” you can have the following tags: orange smoothies, mango smoothies; you see where I’m getting at?
And lastly, product attributes are an important way to group products. Let’s say you’re running a kid’s clothing store. The product attributes you can play with can be the age, the size, the color of your products. This file format has two purposes that are crucial to WooCommerce.
- “Filter Products Attribute”: You can select a specific attribute by using the “Filter Products by Attribute” option. Customers can filter products in your store based on the attribute if you add this widget to your sidebar.
- “Variable Products”: To define a variable product, an attribute for the product must first be classified. These characteristics can then be used to distinguish between different variations. For more information, check out our article on product variables.
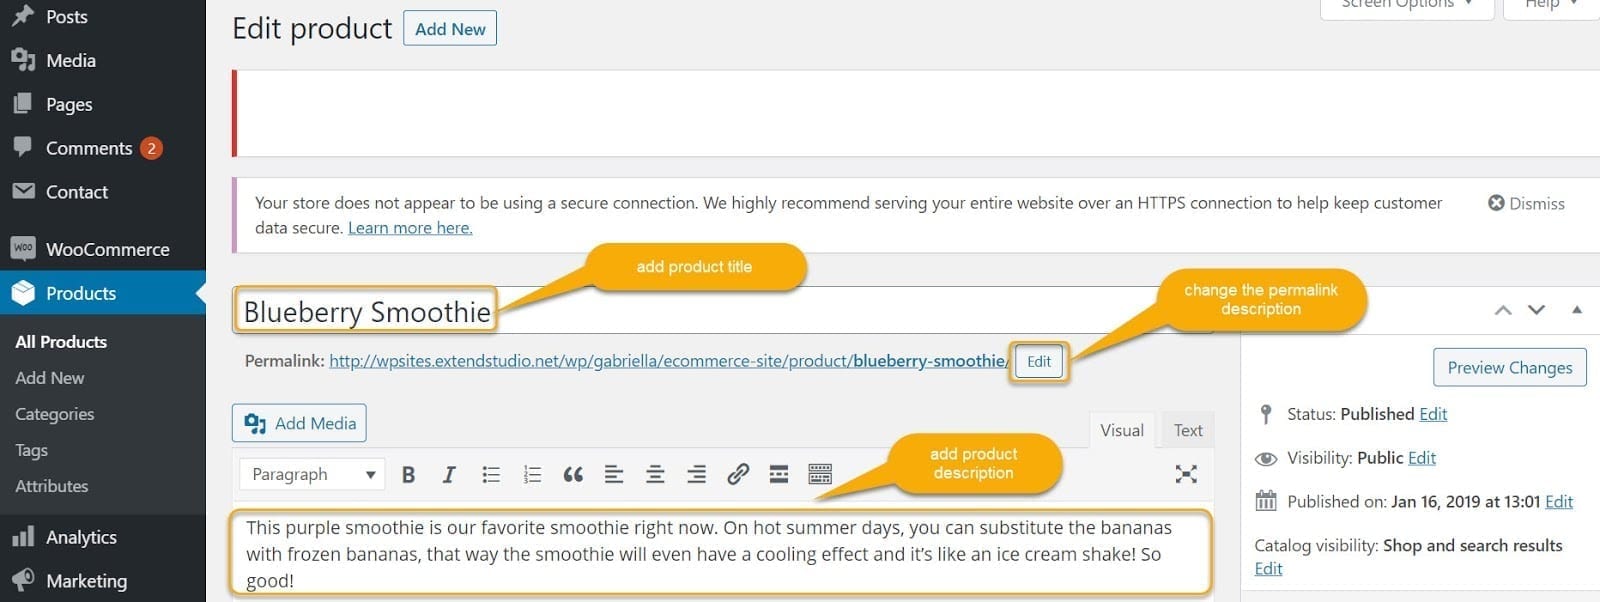
With this in mind, there are still a couple of minor details that you might want to remember each time you add a new product. Keep in mind to change the product title, product description, price, tags+ categorization, and link/URL. See below what we’re talking about. The moment you type in your product name, a URL will be generated below. That’s the URL of your product. You can edit it if you want; maybe you do not want the whole product name to show up, but a shorter version.
And speaking of URLs, there’s one more thing worth mentioning: permalinks. What is a permalink? Permalink is an abbreviation for “permanent link.” Permalinks are permanent URL components that help coordinate your website’s content such that users can navigate, share, and counterpoint it effectively.
You can adjust or modify your permalinks from your WordPress Dashboard → WooCommerce → Settings. You can customize the URL structure for your online store and product pages from this section.
Hint: It’s a good idea to include content-related keywords in your permalink as a best practice.
Step 5: Design Your Product Page
Now that you have all of the above ready to sail, there’s only one more thing you need to do. What could that be? Your product page, of course.
This is what your customers will see once they open up your page. Your product page is just another regular WordPress page, which you can update via the dashboard/pages of WordPress.
And once you finish listing all your products, it should look something like this. ?
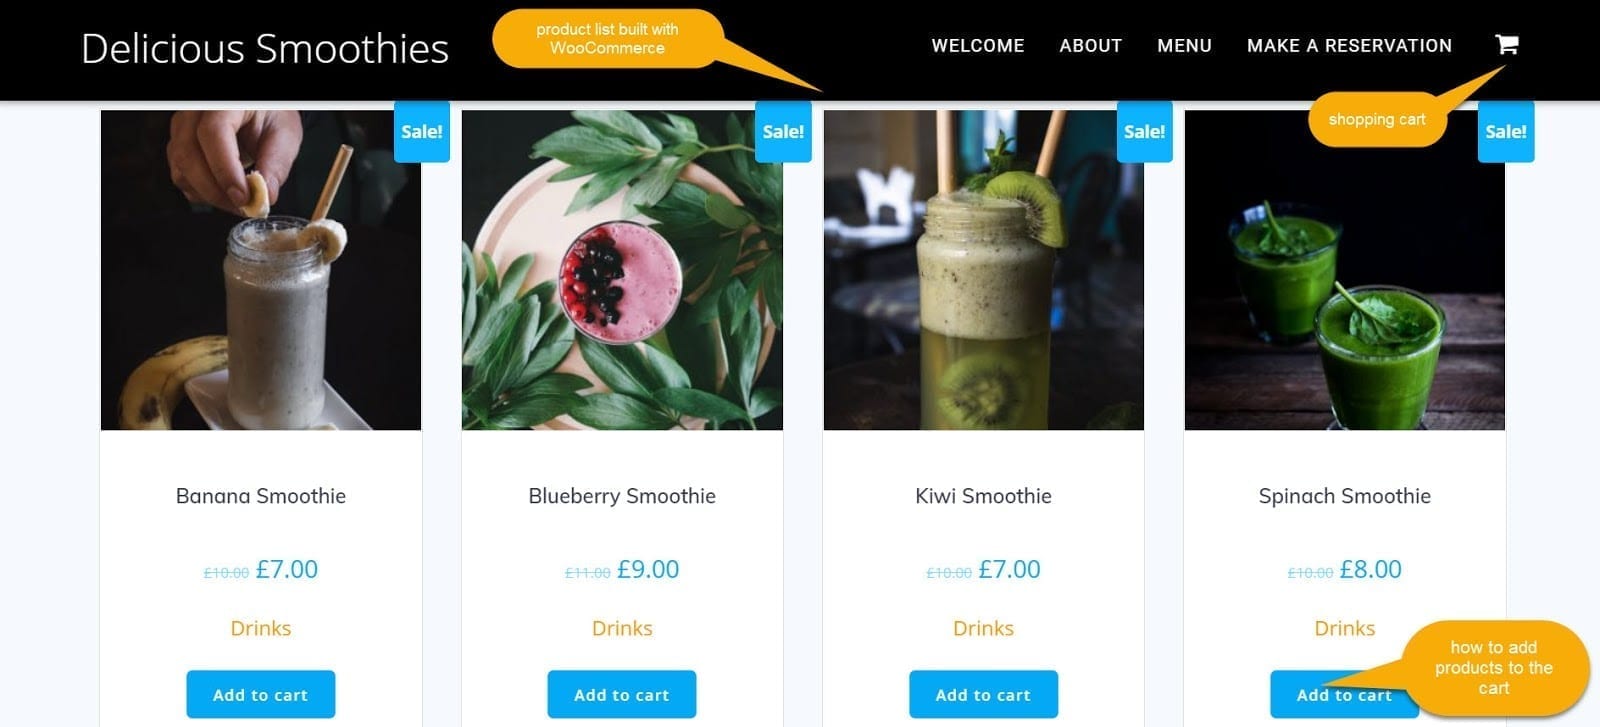
As you can see, visually appealing is just another checkbox we ticked out by creating this sample product page.
Good to know: Aesthetic presentation should be a significant factor in your eCommerce store, specifically when developing a solid relationship and brand identity with your guests.
Why? Because the more visually appealing your product is, the more likely your customers will make a purchase. For example, take a look at the smoothies we’ve displayed above. Don’t they make your mouth water instantly? That’s because they’re made in a way that pleases the eye.
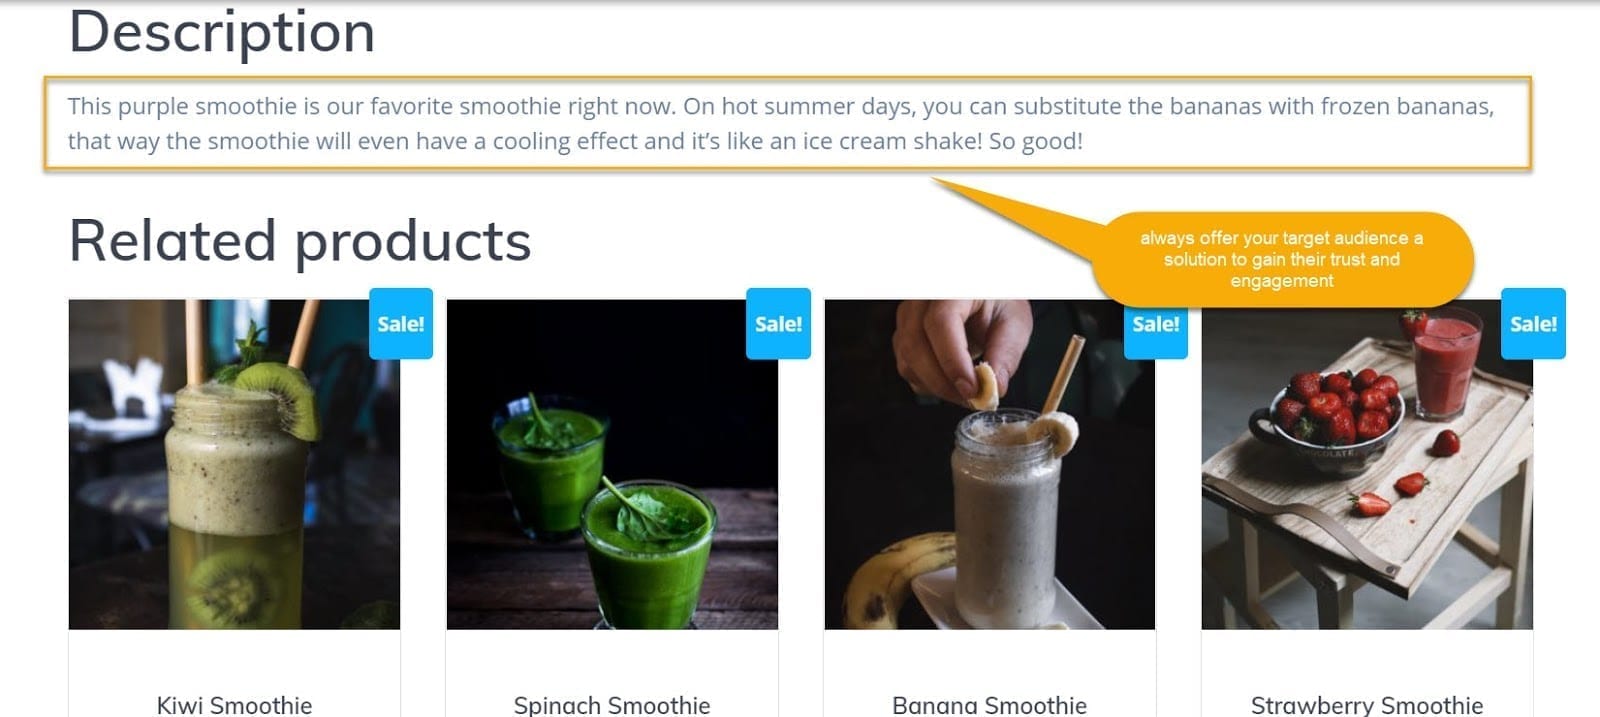
And, let’s not forget about good copywriting, shall we?
Another pro tip here is that you should always include catchy product descriptions that speak for themselves. Just like this:
Step 6: set Up Your Shopping Cart
One last step before you head out: setting up your shopping cart.
So, before you start thinking to yourself that you have no idea where and how you should set up your cart, follow these steps that are here to guide you.
First, you have one more plugin to install: WooCommerce Menu Cart.
This plugin will allow you to customize and adjust your cart according to your needs.

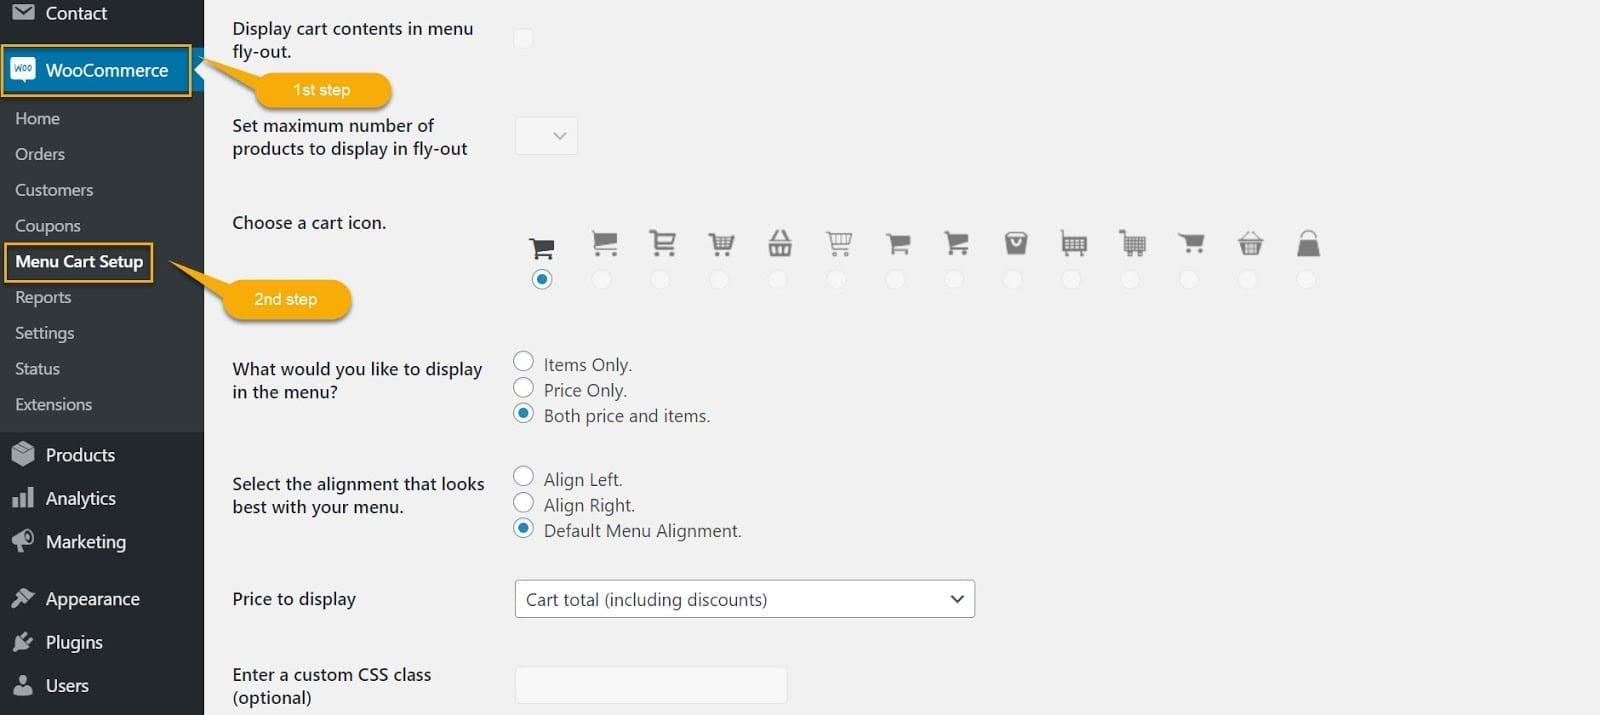
Note: The plugin’s free version only allows you to use the default icon to be displayed. You will need to buy the pro edition if you want more icon options.
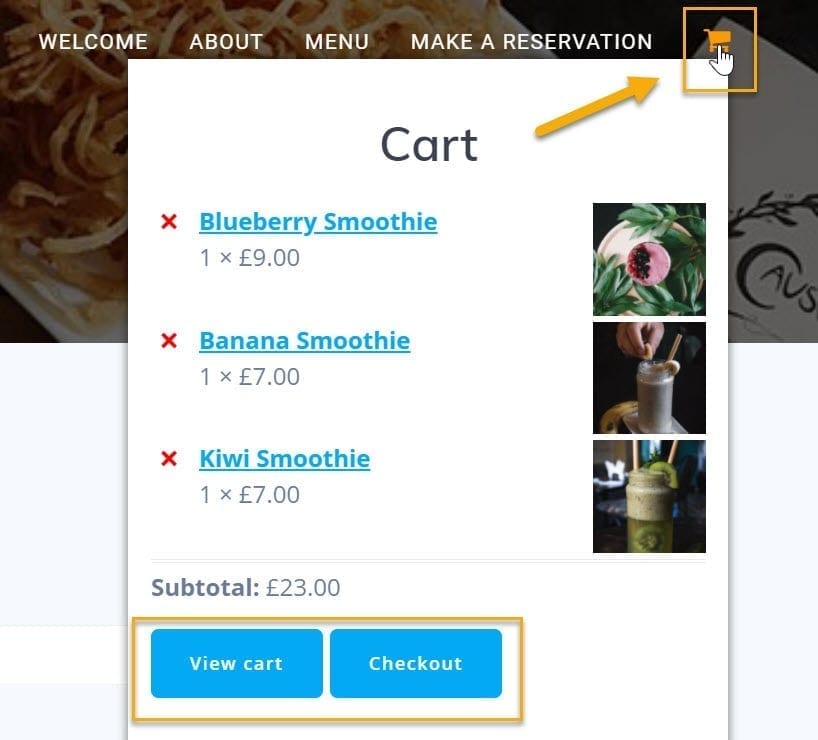
You may also opt to show prices, products from the cart, or both. Finally, choose where you want to place the cart.
Once consumers are ready to complete their order, their cart will resemble this one. ?
Wrap Up
At this stage, you’re probably familiar with a few things we discussed:
- Why add a shopping cart in the first place
- Why opt for WooCommerce
- How to make a product list
- Why pay attention to design elements and writing styles
- How to add a shopping cart using WooCommerce
These are the key elements you might want to remember.
WooCommerce is more than just a simple plugin for your eCommerce store. It gives your website a personalized look and enables you to create just what you want. Starting from giving your customers a unique shopping experience to adding extended functionality to your website.
Have you used WooCommerce before? Do you know another way to achieve all of the above? If so, let us know in the comments section below. We’d love to hear from you.

Gabriella is a Digital Content Writer and Marketer with a zeal for all things WordPress. When she’s not researching and drafting the upcoming articles, you can find her in the open air exploring the outdoors with her dog.


Comments are closed