

Payment gateways play a critical part in ensuring that your customers have a smooth payment experience while your store manages to optimize its conversion rates. As a result, you should exercise extreme caution when selecting payment gateways for your online store.
We’ve written an article on handling WooCommerce payment gateways, so if you’re feeling overwhelmed, feel free to give it a try.
However, if you’re considering adding Stripe to your WooCommerce store, here’s what you need to know:
Stripe is a popular online payment processor used by many websites because of its transparent transaction fees, multiple security products, and ease of integration with most eCommerce platforms.
With a WooCommerce Stripe portal, you can accept safe payments through your online store while also providing your customers with unique features like recurring billing, subscriptions, and alternative payment methods like Apple Pay and Google Pay.
This article will walk you through the steps to correctly integrate WooCommerce with Stripe and some bonus points that are good to keep in mind.
First of all…
Why Should You Integrate Stripe With WooCommerce?
In short, because it’s easy. But also because of its precise transaction cost, various security products, and ease of integration with most eCommerce platforms.
You can integrate them with the help of a plugin. But more on that later. What’s important to know is that Stripe works with WooCommerce and other WordPress payment systems and plugins. Stripe is, in fact, one of the most widely utilized payment processors among WooCommerce users.
Let’s look at some of the most notable benefits of integrating Stripe with WooCommerce.
- Accept credit and debit card payments;
- Accept Apple Pay as a form of payment;
- Accept Alipay as a form of payment;
- Direct checkout on-site for a better user experience;
- Low transaction fees and a simple payment structure;
- Thousands of customers trust this secure and trustworthy payment mechanism.
Stripe & WooCommerce FAQ
- Does Stripe accept debit cards?
The answer to that is yes. Stripe’s payment platform allows you to accept credit cards, debit cards, and popular payment methods worldwide with a single integration. You can get 3D Secure 2 authentication, card updates, automated retries, and other advanced payment features. In addition, Stripe accepts credit cards as well as debit cards. As a result, it is an excellent choice for any website that works on a payment basis.
- How can I set up Test Mode in Stripe?
To create a test authorization, navigate to your WordPress Dashboard and ensure you’re viewing test data. Next, navigate to the Issuing Cards page, select your newly created card, and scroll down to the Authorizations section. Then click the Create test authorization button.
The test mode is enabled by default when you install and activate Stripe. You can also read Stripe’s documentation on testing Stripe Connect if you are more technically inclined.
- Can I use both Stripe and PayPal in my WooCommerce store?
Consider this: When you go shopping, you can pay with cash, credit card, phone credit, debit card, PayPal, and other methods. Right? So should your WooCommerce website. Install multiple payment methods on your WordPress website and then let users choose which ones they want to use to make their purchase.
However, keep in mind that the prices for different payment methods will vary. You should look into different payment gateways to see which offers the best deals for your situation, location, and other factors. Enable PayPal to allow those who trust PayPal to pay securely, and Stripe allows those who can’t stand PayPal to pay directly on your website.
- How can I set up Stripe in my WooCommerce store?
And this is what we are about to show you next. Follow the steps below to connect Stripe to WooCommerce in no time. It’s as simple as setting up a WooCommerce account.
How to Integrate Stripe With WooCommerce
You’ll need to meet a few requirements before using Stripe with WooCommerce, such as:
- Have an active WooCommerce store;
- Install an SSL Certificate;
- Create a Stripe account;
- Install and configure the Stripe plugin.
Step 1: Have an active WooCommerce store
You must first install and activate WooCommerce before proceeding. To get started, go to the WordPress source and download WooCommerce and search for WooCommerce under Plugins → Add New.
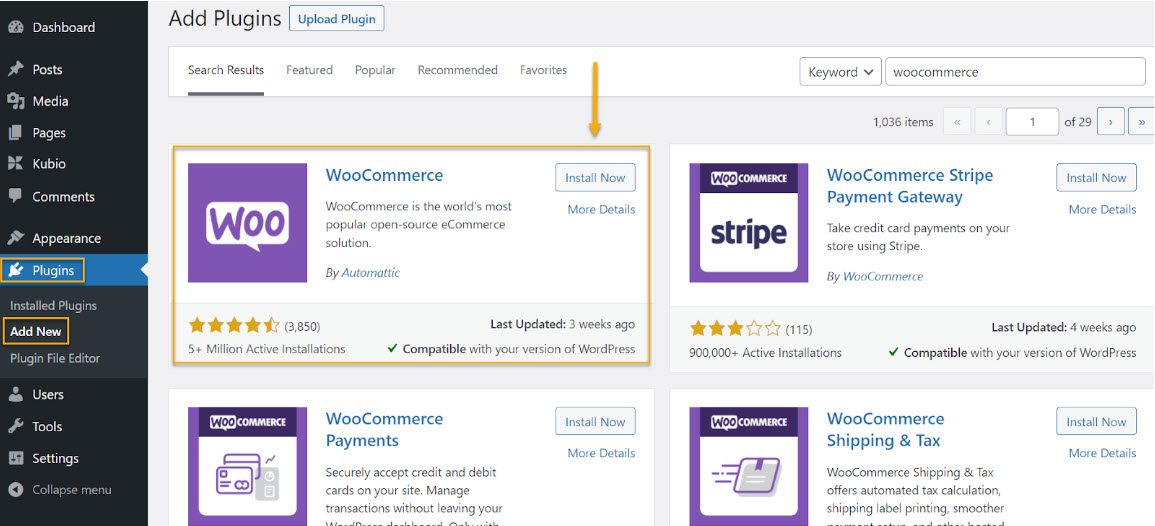
Then, on your WordPress sidebar, navigate to WooCommerce.
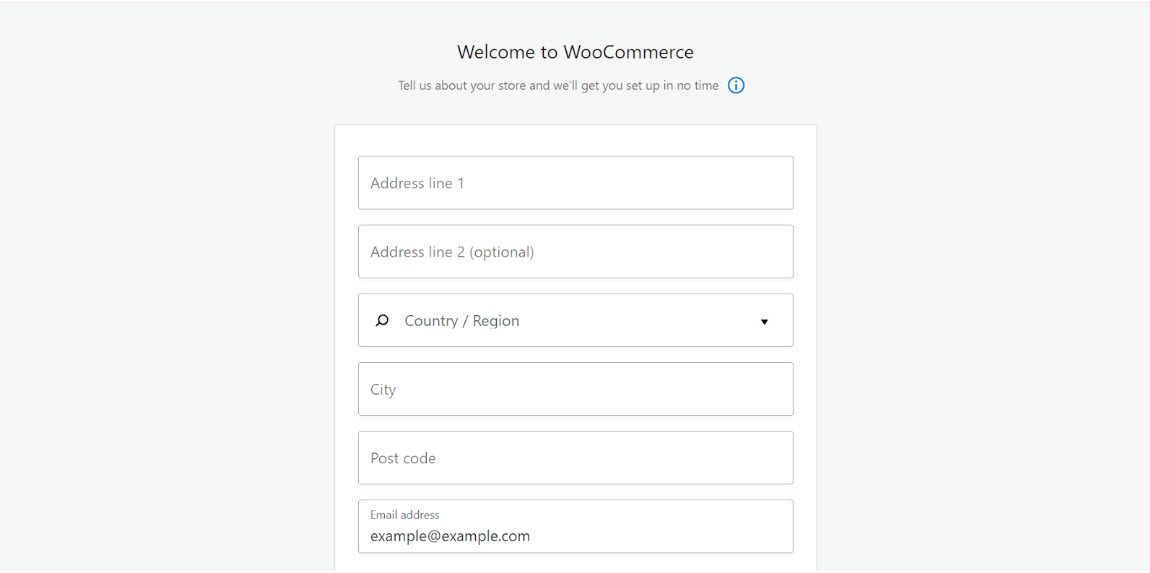
You’ll be asked a series of questions to respond to set everything up. Complete the WooCommerce installation by filling out all the necessary forms and questions.
Once you’ve gone through them all, you have an up-and-running WooCommerce account! Yay! Now, onto the next step.
Step 2: Install an SSL Certificate
SSL certificates establish confidence by establishing an encrypted connection.
Creating a trusted atmosphere in which potential clients feel comfortable making transactions is one of the most critical aspects of an internet company. By providing a secure connection, SSL certificates provide a foundation of confidence.
Most hosting services offer an SSL certificate, and it’s uncommon to find one that doesn’t.
Once you have your SSL certificate, you can set it up easily via a WordPress plugin such as Really Simple SSL.
Go to Plugins → Add New, and look for the plugin we mentioned above.

Step 3: Create a Stripe Account
Finally, you’ll need to sign up for a Stripe account. Go to stripe.com to do so. Fill up the blanks and create your account.

After you’ve set up your Stripe account, you can move on to the next stage to begin integrating Stripe with WooCommerce.
Step 4: Install and Configure the Stripe plugin
WooCommerce Stripe Payment Gateway

As you may already know, WooCommerce is a free and popular eCommerce solution for WordPress websites. This free extension enables these stores to accept payments directly on their websites via the Stripe payment gateway.
The simplicity with which Stripe can be set up is one of its most lauded features. Stripe can be installed during the initial onboarding wizard, or you can install it later. It’s a piece of cake to get it up and running once installed.
Furthermore, iOS users will appreciate the support for Apple Pay, and internet users, in general, will save time by not having to type in payment information associated with their devices. This is due to the plugin’s support for the Web Payments API.
Finally, with data security concerns growing in importance, you’ll be relieved that this data is routed directly to the secure Stripe servers rather than passing through your servers.
Some of the most notable features of this plugin include:
- Adding a Stripe Payment Request allows for faster checkout.
- Button located directly on the product detail or cart pages.
- The integration of your WooCommerce store and your Stripe account is seamless.
- Customers who use Stripe can save their credit card information on your store’s website.
- Includes several filters and hooks for displaying login status, reviewing orders, etc.
- This Stripe WordPress plugin is completely free to use.
So here’s what you need to do to get started:
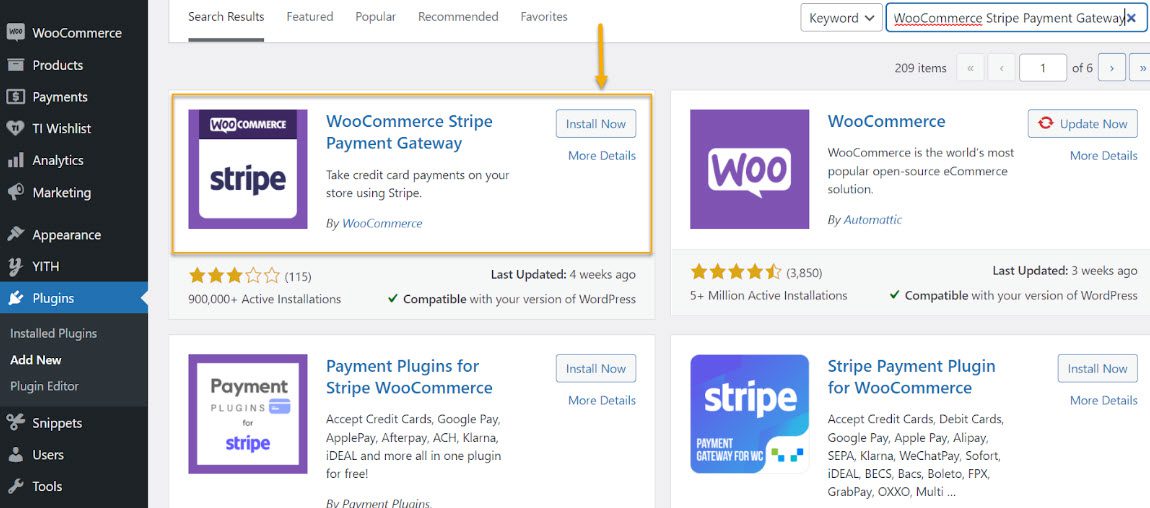
First and foremost, you need to install the WooCommerce Stripe Payment Gateway plugin. So go ahead and do that from Plugins → Add New.
After you install and activate the plugin, it’s time to configure it.
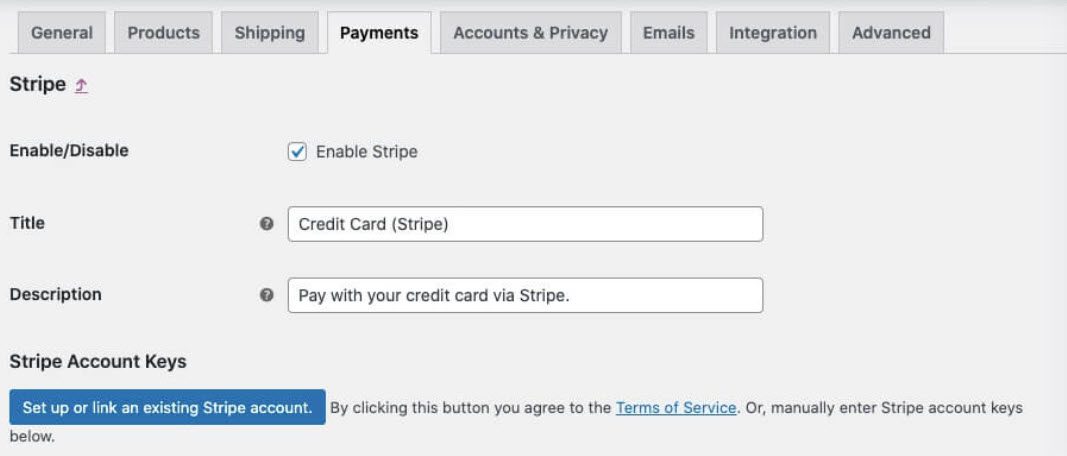
Navigate to WooCommerce → Settings and select the Payments tab.

If you scroll down, you’ll see a long list of Stripe options, such as Stripe giropay, Stripe EPS, Stripe iDEAL, etc.
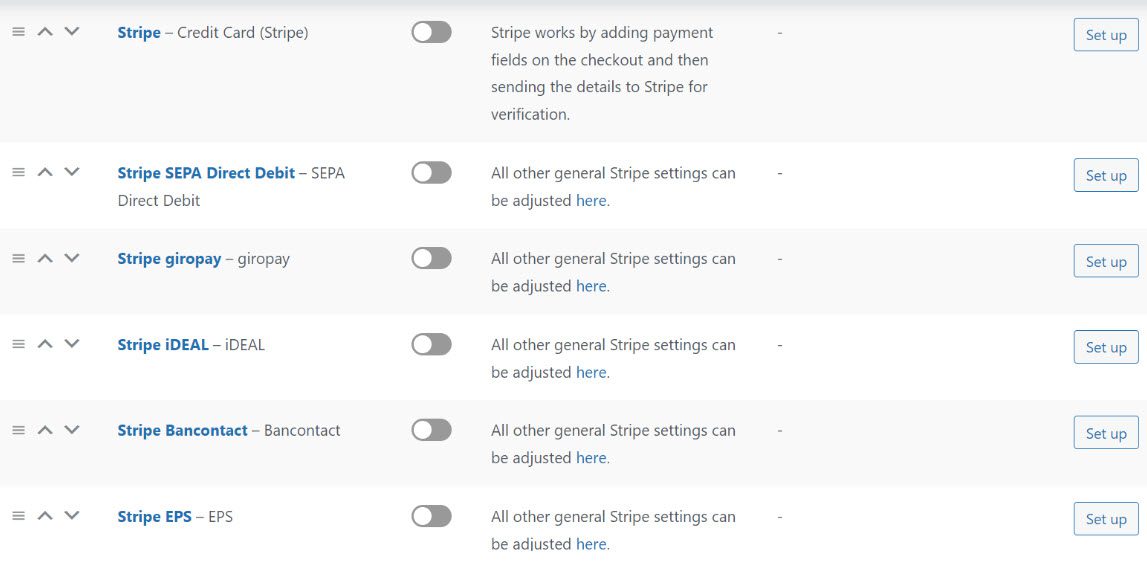
Click on the Stripe Credit Card option on the right side of the panel and begin setting up your payment option.

Here, you must manually enter keys that you can copy from your Stripe dashboard. So return to stripe.com and copy and paste the keys from your account.
When the new checkout experience is enabled, you can change the payment method title by editing the Name under Display Settings if more than one payment method is available.
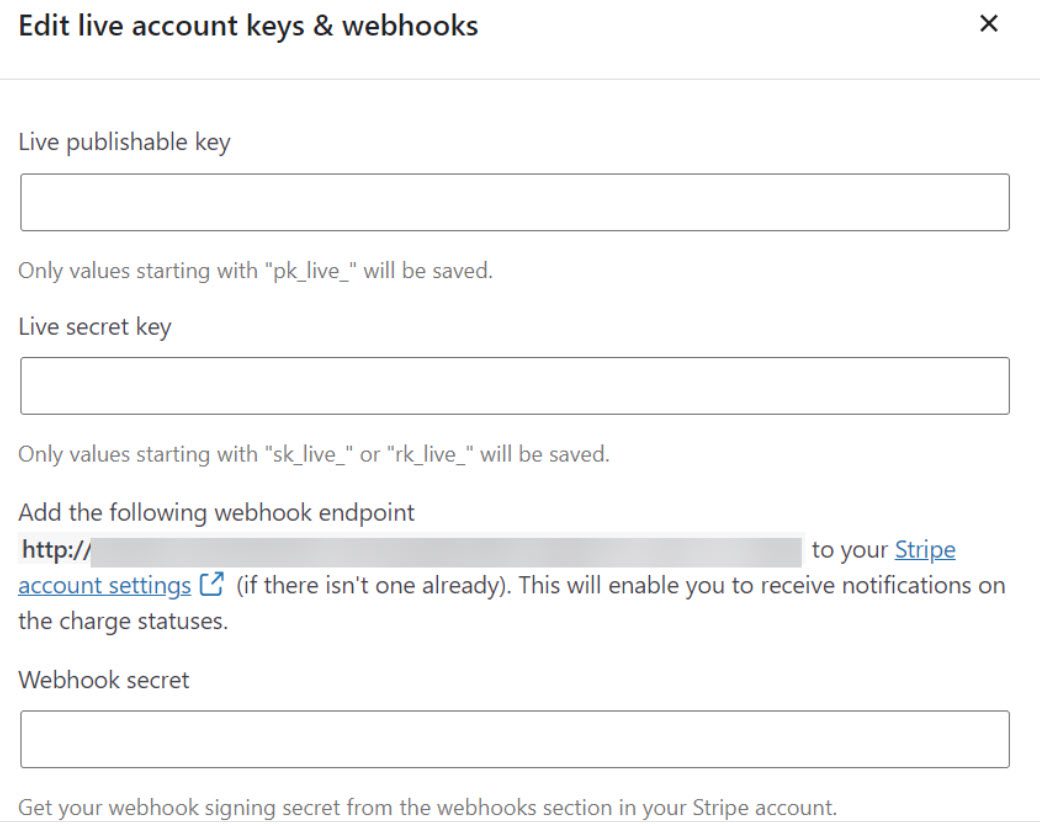
After you enter the account keys and webhooks, you can include the payment method’s name and description. When a customer makes a purchase, this is what they will see:
When you’re finished, click the Save Changes button at the bottom. That’s it! You’ve successfully linked your Stripe account. After a successful payment, you can view and manage the details in WooCommerce’s Subscriptions tab.
Over to You
Setting up a WooCommerce Stripe payment gateway is free and only requires some setup in the settings area. Stripe then sends you payment notifications and deposits the funds into your preferred bank account within a few days.

Gabriella is a Digital Content Writer and Marketer with a zeal for all things WordPress. When she’s not researching and drafting the upcoming articles, you can find her in the open air exploring the outdoors with her dog.


Comments are closed